A carbon fiber hood can reduce mass high on a vehicle, create a distinctive finish, and—when engineered for the application—help manage under-hood airflow. But the best Carbon Fiber Hood is not simply the one with the most visible weave. Construction, complete installed weight, hinge and latch reinforcement, panel gaps, secondary retention, heat protection, and quality control determine whether the result is useful and dependable.

Quick answer: is a carbon fiber hood worth it?
It can be worth it when you want a lighter Carbon Fiber Hood assembly, a genuine carbon appearance, or model-specific venting—and the part is engineered around the vehicle’s mounting and retention system. Compare the complete ready-to-install assembly, not a bare shell, and budget for professional fitting. A poor lightweight panel can create more problems than a slightly heavier, properly reinforced one.
What is a carbon fiber hood?
It is an exterior closure made wholly or partly from carbon-fiber-reinforced polymer. A visible carbon surface does not describe the complete structure. Similar-looking hoods may use different inner frames, core materials, resin systems, edge treatments, and reinforcement around hinges and the latch.
| Construction | Typical characteristics | Questions to ask |
|---|---|---|
| Prepreg full carbon | Controlled laminate and potentially low mass | What is the cure process, inner structure and hardware provision? |
| Carbon outer/composite inner | Balances appearance, stiffness and cost | What reinforces the hinges and latch? |
| Carbon skin/fiberglass backing | Visual carbon with a heavier substrate | Is construction disclosed and what is complete weight? |
| Sandwich or cored panel | Can deliver stiffness efficiently | How are edges sealed and loads distributed? |
| Race-weight/lift-off panel | Minimal competition-focused structure | Does it support factory hinges and latch? |
Ask for an underside photo, construction description, measured weight, and included-hardware list. Our carbon fiber car modification guide covers broader material and project planning.
Real benefits—and their limits
Potential weight reduction
Replacing steel can reduce mass, but savings vary. An aluminum original hood may already be light. Reinforcement, vent grilles, washers, latches, shielding and secondary retention add weight. Suppliers should state whether a published figure means a bare panel or the assembly you will actually drive with.
Appearance
Consistent weave, controlled gloss and clean edges create a premium look. Distorted weave, cloudy clear coat, pinholes and resin-rich areas are also useful inspection clues. Cosmetic perfection cannot replace structural integrity, but it matters to value.
Vehicle-specific airflow
A vented hood may help evacuate hot air only when vent position and geometry suit the vehicle. Decorative openings do not automatically improve cooling; pressure zones, radiator ducting, sealing and underbody airflow determine the result.
How much does a carbon fiber hood weigh?
There is no credible universal number. Compare complete assemblies: weigh the original with insulation, washer equipment and installed hardware; then weigh the replacement with every bracket, grille, latch part, shield and retention device. Use the same scale and units and record anything removed or relocated. This prevents a bare race shell from being compared with a complete road-car assembly.
The underside tells you more than the top
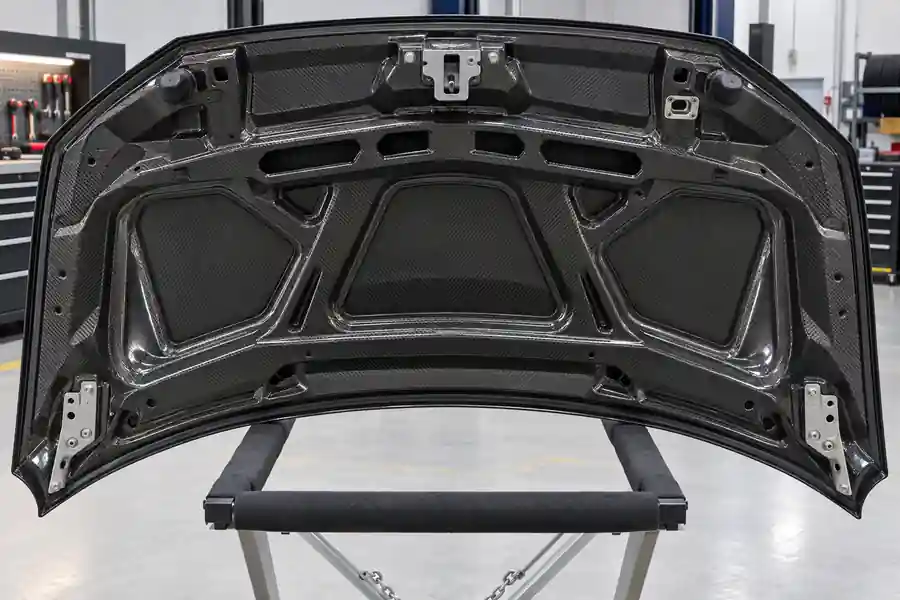
Look for stable attachment points, consistent bonding, sealed edges and provisions for factory equipment. Concentrated loads occur at hinges, the primary latch, safety catch, bump stops and any gas-strut mounts. Before ordering, confirm whether factory hinges and latch transfer; whether washer nozzles, hoses, seals and insulation are supported; whether vents include screens or trays; and whether the part is intended for road, show or competition use.
Carbon Fiber Hood Fitment: check every interface
Match generation, model year, body style, facelift and market specification—not just the model name. Headlamps, bumper covers, fenders, the cowl and aftermarket braces can alter surrounding geometry.
| Interface | Dry-fit check | Why it matters |
|---|---|---|
| Hinges | Bolt pattern, reinforcement, adjustment range | Controls rear height and panel position |
| Latch/striker | Engagement, centering and release | Critical to secure closure |
| Safety catch | Positive engagement and release access | Provides a second stage where fitted |
| Bump stops | Contact, height and load distribution | Controls movement and flushness |
| Fenders/bumper | Gap width, symmetry and height | Reveals alignment problems |
| Cowl/wipers | Clearance through full opening arc | Prevents contact damage |
Dry-fit before drilling, trimming or finishing
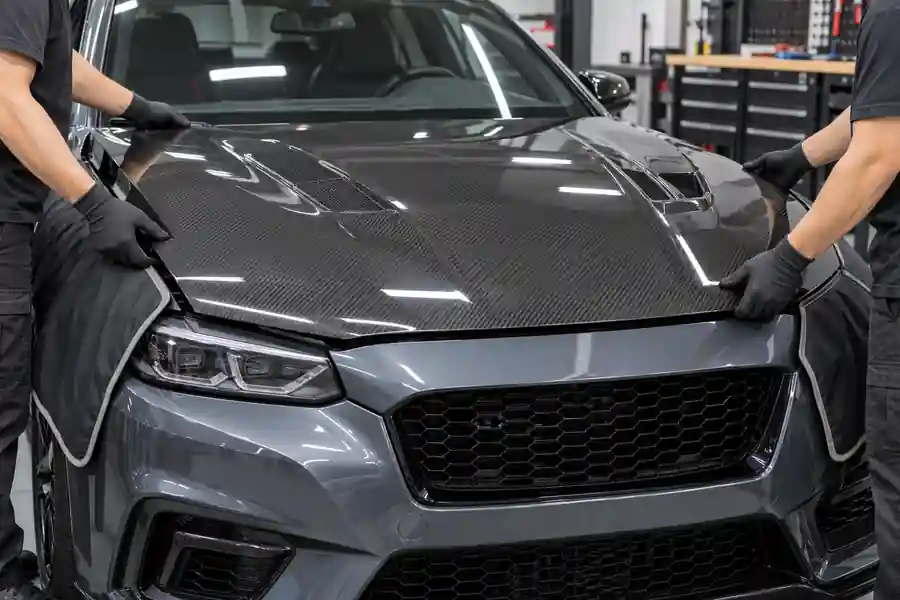
Professional installation is strongly recommended. Support the hood evenly, install fasteners loosely and adjust in small steps. Never force a latch to compensate for incorrect position.
- Inspect the carton and panel before removing protection.
- Compare part number, application and underside interfaces with the original.
- Place the hood on its hinges with help; never let it hang from one corner.
- Establish rear and side gaps before finalizing latch engagement.
- Check flushness using approved hinge and bump-stop adjustment.
- Test opening, closing, release and nearby clearances repeatedly.
- Only after an acceptable dry fit should approved drilling, trimming or finishing begin.
Follow the exact hood manufacturer’s fastener and torque instructions. Composites can be damaged by point loading or overtightening, so values copied from an unrelated product are not appropriate.
Do carbon fiber hoods need hood pins?
The Carbon Fiber Hood manufacturer’s instructions decide. Some brands require secondary pins or latches even when the factory latch remains. Competition panels may be designed around external retention instead of factory hardware. Never assume that a factory-style latch makes secondary retention optional.
For example, SEIBON’s official instructions require hood pins for its products, while the Anderson Composites guide strongly recommends professional installation. These are brand-specific directions; follow the documents supplied with your exact hood and hardware.
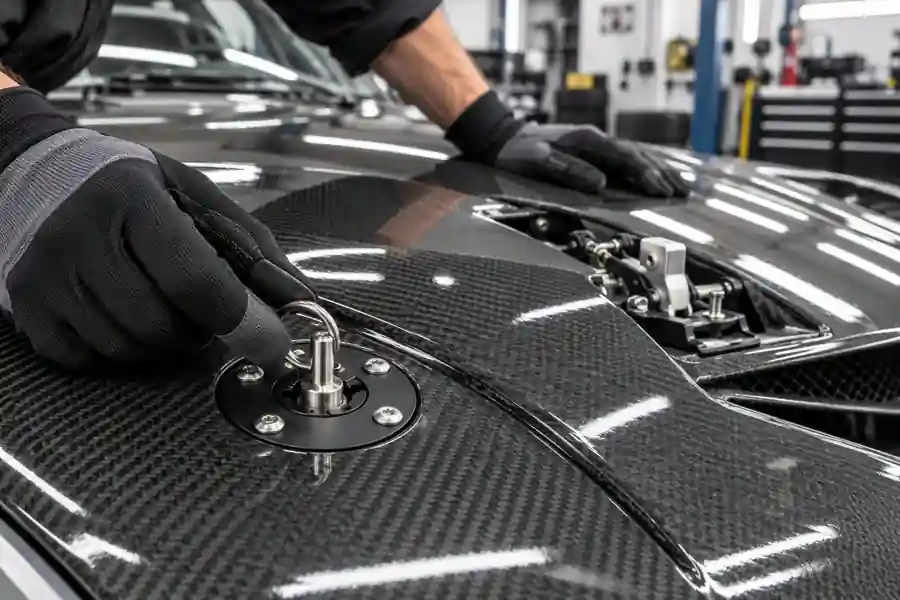
Do not copy drilling locations, pin projection or tightening values from another car. The installer must verify reinforcement, closing path, underside clearance and load distribution.
Primary latch, safety catch, bump stops and gas struts
The primary latch should engage smoothly and release normally. Slamming is not a fitment method. If excessive force is required, stop and inspect hood position, striker alignment, bump-stop height and interference. Balanced bump-stop contact helps control flushness and vibration without bowing the panel.
A gas strut selected for a heavy original hood can overload a lighter composite panel or its mounts. Do not automatically transfer it. Use only a support method approved by the hood maker; a manual prop rod may be correct for some applications.
Vented hoods: heat and water
| Feature | Possible benefit | Check first |
|---|---|---|
| Rear-facing extractor | May evacuate hot air | Pressure zone, ducting and component exposure |
| Open louver | Direct flow path | Water path, screen and edge finish |
| Removable rain tray | Helps manage parked-weather exposure | Drain route, clearance and airflow compromise |
| Mesh screen | Reduces large debris entry | Attachment and service access |
Map the area below every opening. Avoid directing water toward exposed filters, ignition parts or electrical connectors. Confirm whether approved insulation or reflective barriers can be installed, especially near exhaust or turbocharger heat. Our automotive carbon fiber overview explains why fiber, resin, process and structural design must be evaluated together.
Post-installation inspection
- Check hinge and latch fasteners for movement without overtightening.
- Look for witness marks, rubbing, edge contact or localized cracking.
- Confirm that every secondary latch engages consistently.
- Inspect bonded joints, vents, mesh and rain-management parts.
- Stop driving if the hood lifts, vibrates abnormally or does not retain positively.
Common problems
| Symptom | Possible cause | Response |
|---|---|---|
| Uneven gaps | Hinge position, surrounding panels or wrong application | Return to a loose dry fit and measure references |
| High front edge | Bump stops, latch position or interference | Inspect engagement; never force closure |
| Cracking near hardware | Point load, overtightening or poor reinforcement | Stop use and assess the structure |
| Vibration at speed | Retention, support or aerodynamic load | Stop driving and inspect the complete system |
| Water below vents | Unmanaged path or missing tray | Correct water management before exposure |
Pre-purchase checklist
- Exact vehicle, year, body style, market and facelift compatibility.
- Outer skin, inner frame and reinforced-interface construction.
- Bare and complete installed weights.
- Hinge, primary latch, safety catch and bump-stop compatibility.
- Manufacturer requirement for hood pins or secondary latches.
- Washer, seals, insulation, vents and rain-tray provisions.
- Finish, UV-care instructions, warranty and installation guide.
- Packaging method and damage-inspection procedure.
See our Model 3 carbon fiber hood example, browse automotive body parts, or contact Noah Automotive with the vehicle details and intended use.
What B2B buyers should request
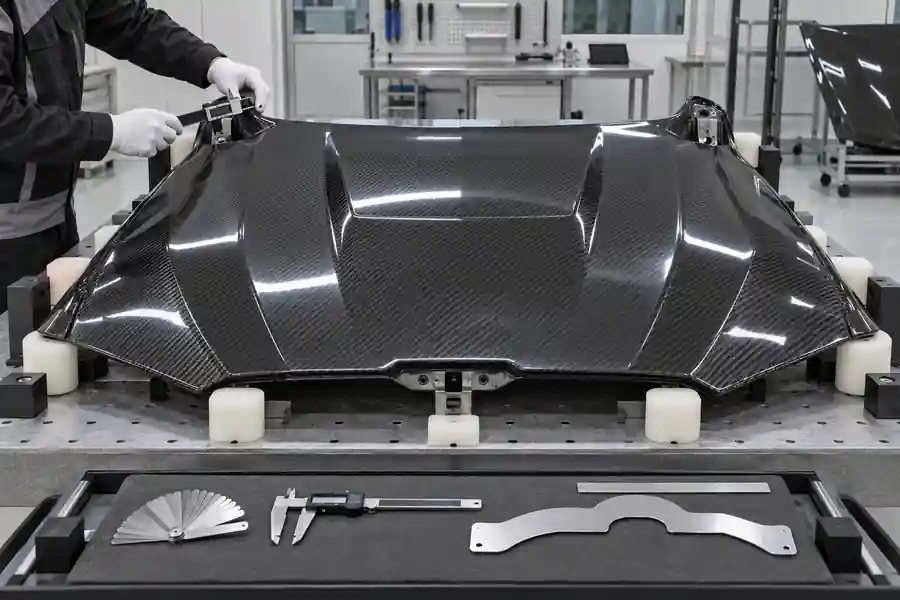
Distributors, installers and private-label buyers need repeatability, not just an attractive sample. Define an approved master part and measurable plan covering hinge and latch datum positions, edge profile, surface defects, weave presentation, insert security, bonded joints, packaged weight and carton protection. Request batch traceability and inspection photos, and agree how damage and fitment claims will be documented.
Frequently asked questions
Is a carbon fiber hood always lighter?
No. Construction and hardware vary, and an aluminum factory hood may already be light. Compare complete assemblies.
Can I reuse the factory latch?
Only when the hood maker permits it. Verify reinforcement, geometry, adjustment and engagement.
Do carbon fiber hoods need hood pins?
Follow the exact manufacturer’s instructions. Some explicitly require secondary retention even with the factory latch.
Can I install one myself?
Professional installation is the safest default. The panel is large and easy to damage, while secure alignment requires experience.
Will vents lower engine temperature?
Only a vehicle-specific airflow design can establish that. Position, pressure, ducting and sealing determine the effect.
Can rain enter through vents?
Yes. Inspect what sits below and use approved trays, drains or protection where required.
Should I reuse factory gas struts?
Not automatically. Their force may be unsuitable. Use only the support method approved for the replacement hood.
Final recommendation
Choose a carbon fiber hood by its complete engineering story: correct application, disclosed construction, comparable installed weight, reinforced interfaces, secure retention, managed heat and water, and documented QC. Dry-fit first, follow the exact manufacturer’s instructions, and use a qualified installer. That produces a safer and more defensible upgrade than buying on weave and headline weight alone.