A front lip is usually a bumper-edge extension chosen mainly for appearance and modest airflow management, while a true front splitter projects forward and needs rigid mounting because it can create a meaningful pressure difference and aerodynamic load. Side skirts manage airflow along the car’s sides, a rear diffuser manages expanding underbody flow, and a spoiler changes airflow at the rear body surface. The names are often used loosely, so judge a part by its geometry, mounting and test evidence—not the product label alone.
If you are comparing front lip vs splitter, or wondering whether side skirts and a rear diffuser actually work, this guide gives you a practical framework. It covers street styling, performance use, carbon-fiber construction, installation and the evidence a buyer should request before accepting an aerodynamic claim.
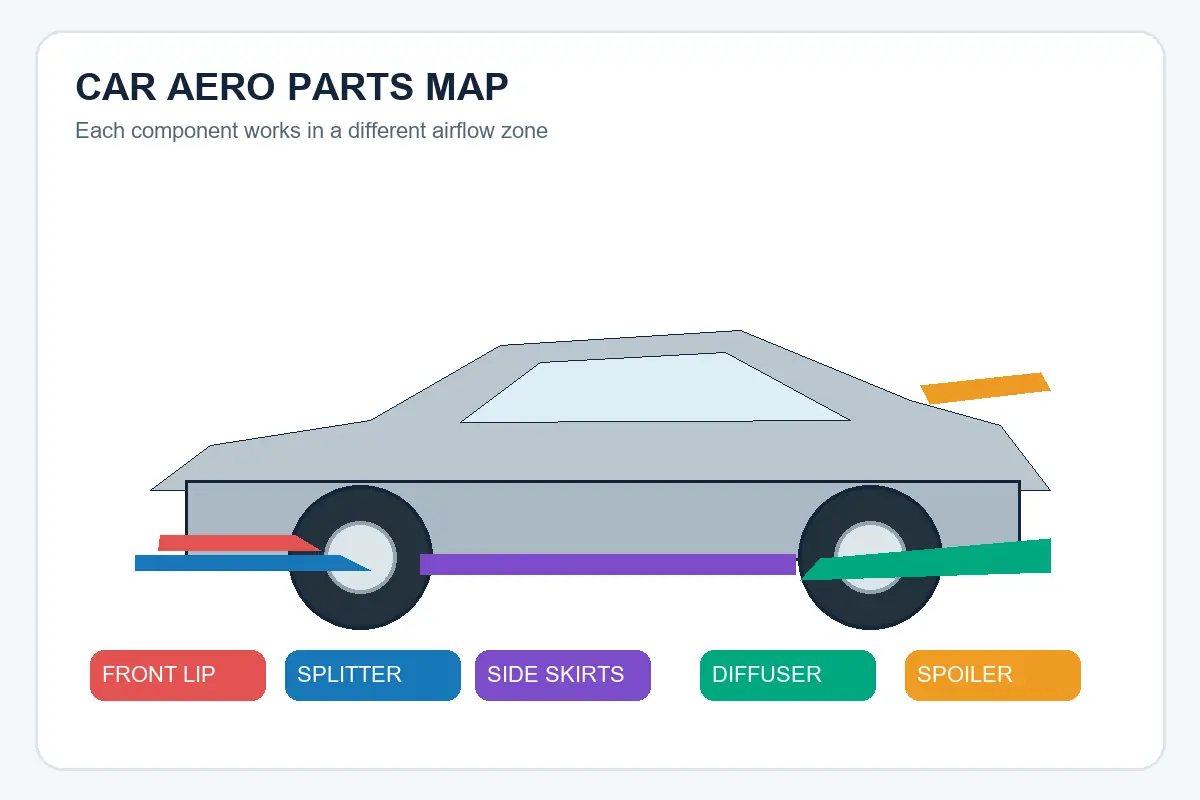
Front Lip vs Splitter vs Side Skirts vs Rear Diffuser: Comparison
| Part | Typical location | Primary role | Functional requirement | Common buying mistake |
|---|---|---|---|---|
| Front lip | Lower edge of front bumper | Styling and limited airflow guidance | Close fit to the bumper and secure attachment | Assuming every lip creates measurable downforce |
| Front splitter | Horizontal plane projecting from the front | Separates upper and lower airflow; may reduce front lift | Rigid chassis-capable mounting, useful plan area and managed underbody flow | Mounting a loaded splitter only to flexible bumper plastic |
| Side skirts | Along the rocker panels | Manage side airflow and limit high-pressure air entering beneath the car | Appropriate height, continuity and integration with the floor | Treating decorative rocker extensions as guaranteed aero devices |
| Rear diffuser | Rear portion of the underbody | Expands and slows underbody air while recovering pressure | Clean inlet flow, useful length, controlled expansion and exit clearance | Judging performance by large fins alone |
| Spoiler | Rear deck or hatch edge | Changes separation at the body surface; may reduce rear lift | Vehicle-appropriate angle, width and placement | Calling a spoiler a wing or expecting universal results |
The most important distinction is between appearance and validated aerodynamic function. A styling part can still be valuable: it can complete a body line, protect a bumper edge or give a vehicle a lower visual stance. The problem begins only when an untested styling part is sold with a precise downforce or drag claim.
What Is a Front Lip?
A front lip—also called a lip spoiler or bumper lip—is normally attached to the lowest visible edge of the front bumper. It may extend the bumper downward, slightly forward or both. Many lips follow the bumper’s original shape and use existing holes, clips, screws or adhesive-assisted mounting.
Because a lip can reduce the gap below the front bumper or sharpen its lower edge, it may influence how air approaches the underbody. However, a small lip mounted to flexible bumper trim should not automatically be treated as a structural aerodynamic device. Its actual effect depends on projection, sealing, ride height, local pressure, vehicle speed and the rest of the underbody.
When a Front Lip Is the Better Choice
- You want a more aggressive factory-plus appearance.
- The car is used mainly on public roads with speed bumps and steep driveways.
- You prefer a lighter installation that follows the original bumper.
- You do not need a quantified aerodynamic result.
- You want a vehicle-specific carbon-fiber exterior upgrade with limited visual bulk.
For an example of a vehicle-specific styling component, see Noah’s Model 3 Highland front lip. Always verify model year, bumper version and body configuration before ordering.
What Is a Front Splitter?
A front splitter is a substantially horizontal surface at the front of a vehicle. Its leading portion projects into the airflow, while its upper and lower surfaces experience different pressure conditions. In a properly developed system, this can reduce front lift or produce front downforce while influencing the volume and quality of air traveling beneath the car.
Aerodynamic force is highly speed-dependent. The NASA Glenn drag equation shows that aerodynamic force includes velocity squared. In simple terms, an aero part that has little noticeable load at city speed can experience far greater load at highway or track speed. That is why splitter mounting is an engineering issue, not just an appearance detail.
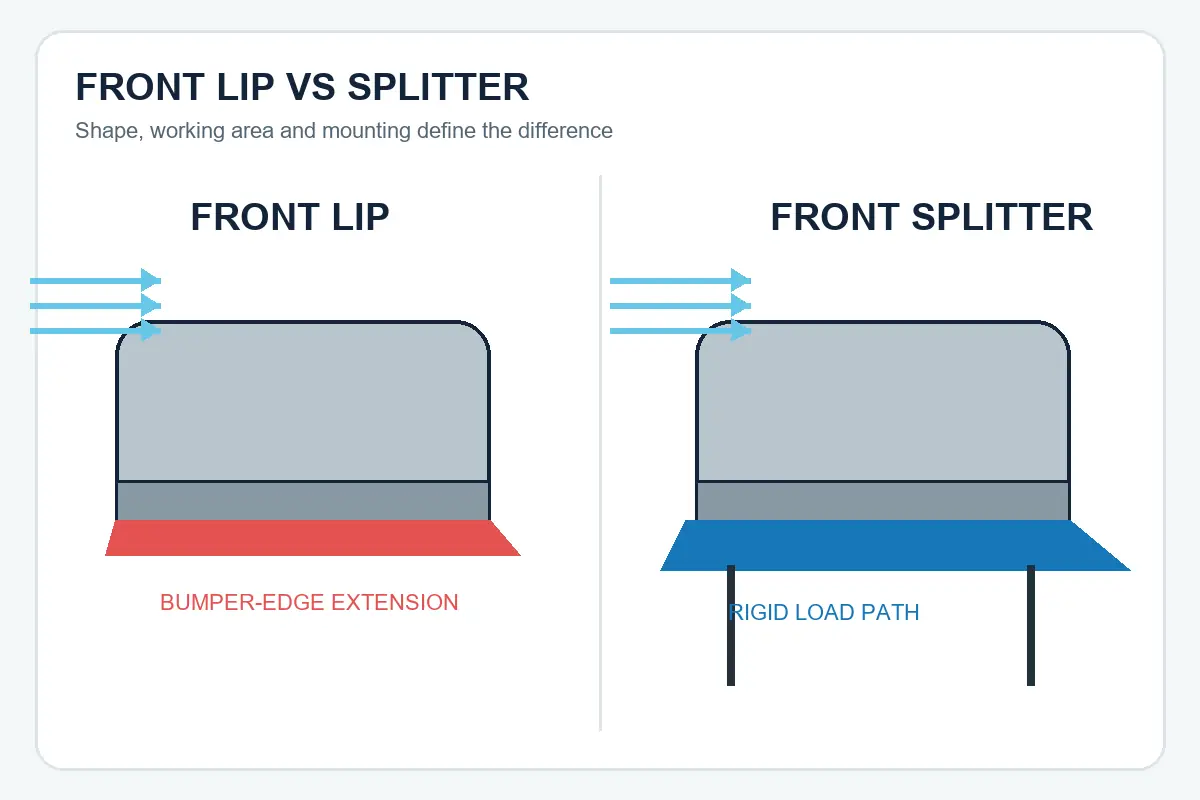
Why Splitter Mounting Matters
A functional splitter should not rely only on unsupported bumper plastic. Depending on the design and intended speed, loads may need to be transferred through brackets, rods or a support frame to rigid vehicle structure. Fasteners require suitable spacing and backing; the installation must also account for vibration, curb contact, service access and controlled failure in an impact.
Before buying, ask for the mounting diagram, hardware list and drilling requirements. For track use, also ask whether the supplier has vehicle-specific CFD, pressure measurements, coast-down data, track correlation or another documented validation method. A rendering alone is not performance evidence.
Front Air Dam vs Splitter
An air dam is primarily a vertical barrier that reduces or redirects air entering beneath the nose. A splitter is primarily horizontal. Many effective assemblies use both: the air dam manages the front face and the splitter provides a working plane. Retail names often mix these terms, so inspect the geometry rather than relying on the title.
What Do Side Skirts Do?
Side skirts occupy the lower body area between the front and rear wheels. On a developed aerodynamic package, they help manage the boundary between fast underbody airflow and higher-pressure air beside the vehicle. By limiting unwanted crossflow into the floor region, they can support more stable underbody behavior.
Not every rocker-panel extension is a functional side skirt. A thin decorative piece positioned high above the road may have little influence beyond appearance. A performance-oriented design considers ground clearance, continuity with the front device and rear floor, wheel wake, jacking points and the way the part seals—or intentionally does not seal—the side of the underbody.
Side Skirts for Street Cars
For a road car, durability and fitment are often more important than theoretical maximum sealing. Check door clearance, lift-point access, tire debris exposure and whether the part projects far enough to be stepped on accidentally. Noah’s vehicle-specific products, such as the Model 3 side skirts and Model Y side skirts, should be selected by exact vehicle generation and verified against the actual sill and bumper configuration.
What Does a Rear Diffuser Do?
A true rear diffuser is an expanding section at the back of the underbody. Air approaching through the floor region enters the diffuser and is given space to slow and recover pressure before joining the wake. With suitable geometry and clean inlet flow, this can help the underbody operate more effectively and may reduce lift or contribute to downforce.
A diffuser does not work simply because it has tall vertical fins. The inlet condition, expansion angle, length, ground clearance, upstream floor, exhaust packaging, suspension movement and rear bumper exit all matter. If the airflow entering the diffuser is already highly separated or blocked, dramatic-looking fins cannot restore an ideal flow by themselves.
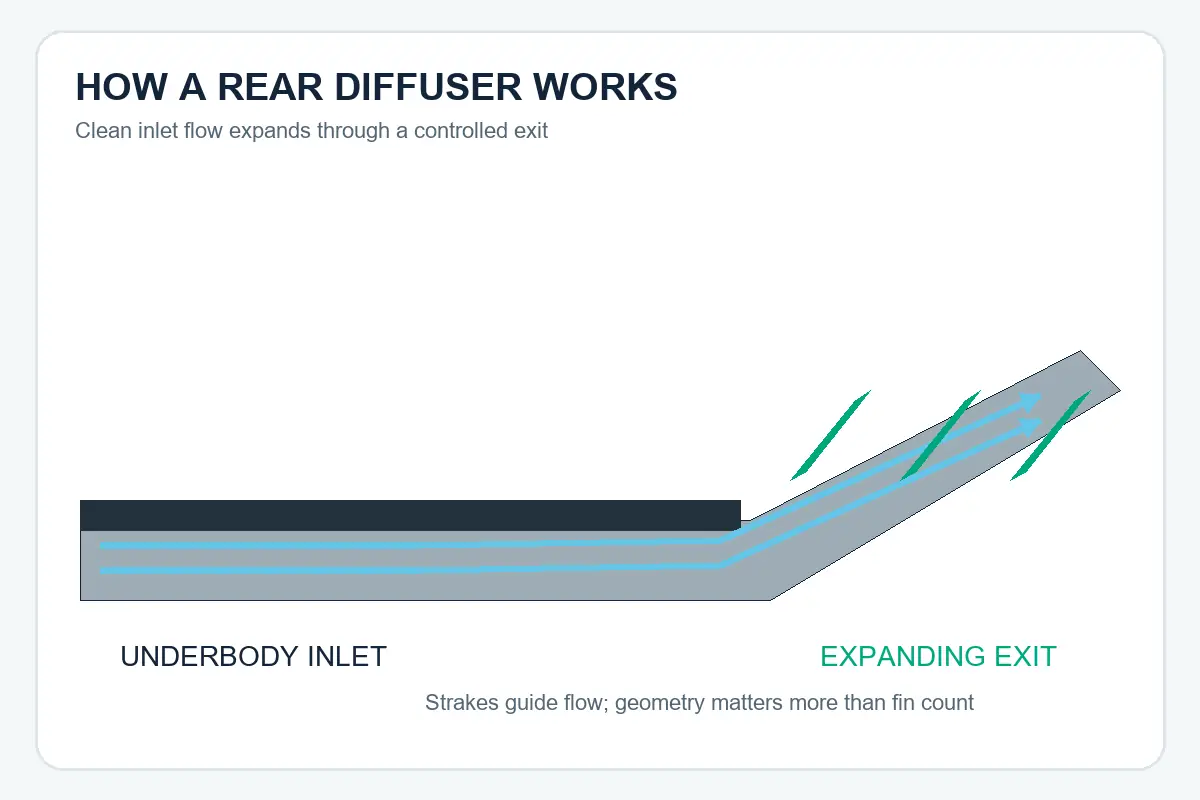
What Are Diffuser Strakes?
The vertical elements are commonly called strakes or fences. They can guide flow, limit sideways migration and help manage disturbances from wheels or exhaust components. Their number and height do not provide a simple measure of performance. More or larger strakes are not automatically better.
For styling-focused upgrades, a vehicle-specific rear diffuser can still give the bumper a cleaner, more technical appearance. Noah offers parts such as the Model 3 rear diffuser and Model 3 Highland diffuser. Treat aerodynamic performance as unverified unless the relevant design has supporting data.
Rear Diffuser vs Spoiler: They Do Different Jobs
A rear diffuser works with airflow beneath the vehicle. A spoiler works at the rear body surface, where it changes separation and pressure around the deck, hatch or roof trailing edge. They are not alternatives in a simple either-or sense; a complete aero package may use both.
A spoiler is also different from a wing. A spoiler modifies airflow attached to or separating from the body. A wing is an airfoil with airflow acting around both its upper and lower surfaces. Wings typically require rigid supports because they can generate substantial load. Small deck-lid spoilers are often chosen for styling and may change rear lift, but the result is vehicle-specific.
For a vehicle-specific example, see the Model 3 Highland carbon spoiler. Confirm the trunk or hatch shape, model year and mounting method before purchase.
Functional Aero vs Cosmetic Aero: How Can You Tell?
No single visual cue proves performance, but the following questions expose the difference between a documented aerodynamic part and a styling claim.
- Is the geometry defined? Look for dimensions, working area, angle or vehicle-specific shape rather than generic adjectives.
- Is the mounting appropriate for the claimed load? A high-load splitter or wing needs a credible load path.
- Was it tested on the relevant vehicle? Generic CFD imagery cannot establish results for every bumper, ride height or underbody.
- Are the conditions disclosed? Speed, ride height, yaw, cooling openings and configuration affect results.
- Is balance discussed? Adding front or rear load alone can alter handling balance.
- Are limitations stated? Credible suppliers distinguish appearance, predicted results and measured results.
The same caution applies to “drag reduction.” A device can reduce lift while increasing drag, or improve local flow while creating a different compromise elsewhere. The NASA Glenn lift equation provides the same useful reminder: aerodynamic load depends on air density, velocity, area and a coefficient that represents geometry and flow conditions.
Aero Parts Must Work as a Balanced System
A car’s aerodynamic balance describes how total aerodynamic load is distributed between the front and rear axles. A large splitter can add front grip at speed, but without suitable rear balance it may make high-speed behavior more nervous. A large rear wing can add rear stability while increasing understeer if the front has insufficient authority.
Street buyers do not need to calculate a competition setup, but they should avoid mixing extreme components only by appearance. Keep ride height, tires, suspension travel, cooling and intended maximum speed in the decision. When a supplier provides data, verify that it applies to the same vehicle, part combination and setup.
Carbon Fiber Aero Parts: What the Material Does—and Does Not—Prove
Carbon-fiber composite can combine low mass, stiffness and a premium surface, making it attractive for lips, splitters, side skirts, diffusers and spoilers. But the visible weave does not prove structural strength or aerodynamic effectiveness. Fiber orientation, laminate thickness, resin system, consolidation, core material, inserts, edge finishing and mounting design all influence the finished part.
For a broader explanation of material and quality indicators, read Noah’s carbon fiber car modification guide. When sourcing an exterior part, ask whether it is a cosmetic skin, a full composite laminate or a sandwich structure. Also request the approved surface finish, mounting points and dimensional inspection criteria.
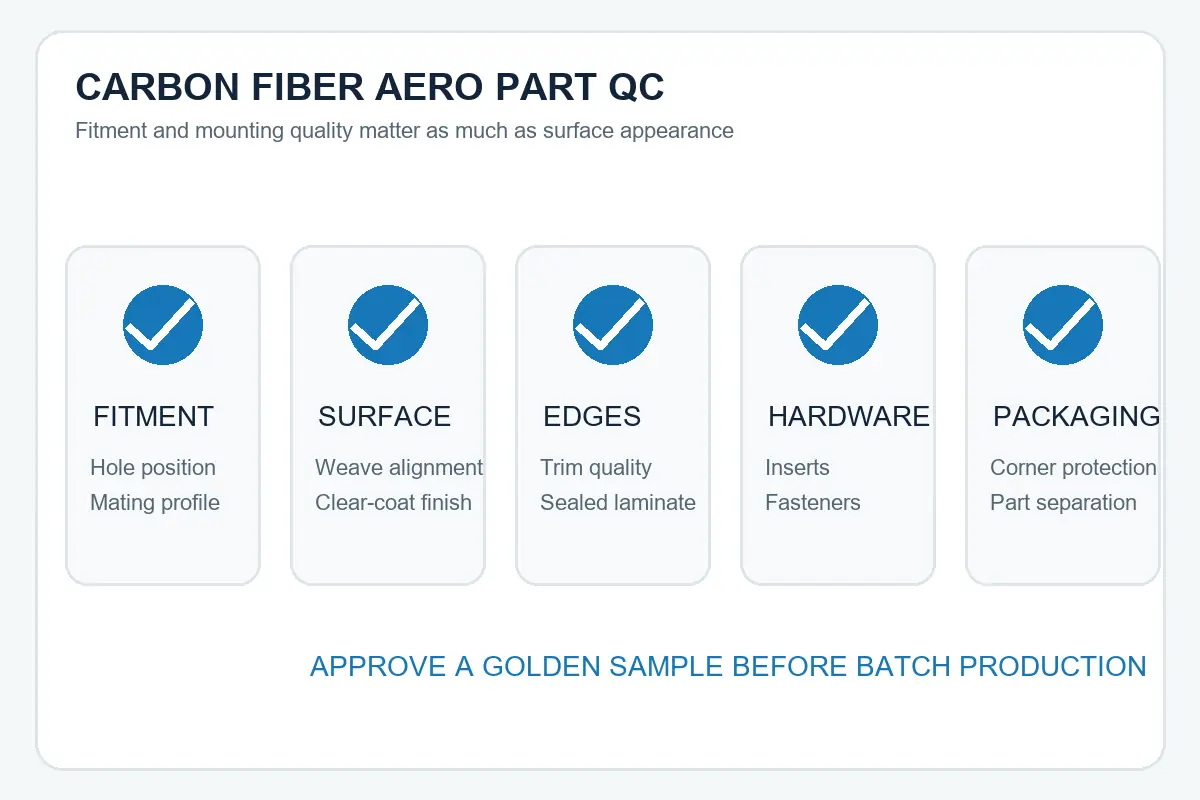
How to Choose the Right Aero Part
If Your Priority Is Styling
Choose a close-fitting front lip, side-skirt extension, diffuser-style bumper insert or subtle spoiler. Prioritize exact vehicle fitment, surface quality, reversible mounting where practical and enough clearance for normal roads. Do not pay a performance premium based only on unsupported downforce language.
If Your Priority Is Street Performance
Look for vehicle-specific development, conservative projection, strong mounting and compatibility with cooling and driver-assistance hardware. Ground clearance and impact tolerance remain important. A balanced package with modest geometry is often more usable than a single extreme component.
If Your Priority Is Track Performance
Request test data, setup conditions and a clear load path. Consider the complete system: splitter, air dam, flat floor where applicable, side management, diffuser and rear aerodynamic device. Suspension stiffness and ride height must keep the aero platform within its working range. Track components may also require regular fastener, bracket and surface inspections.
| Use case | Best starting point | Evidence to prioritize | Main compromise |
|---|---|---|---|
| Appearance-led street build | Vehicle-specific lip and subtle spoiler | Fitment photos, dimensions, finish sample | Scrape risk and added visual complexity |
| Fast road use | Integrated, moderately sized package | Mounting detail and vehicle-specific development | Clearance, noise and service access |
| Track use | Splitter plus balanced rear device | CFD or test data with conditions and load information | Drag, weight, setup sensitivity and maintenance |
| Private-label program | Repeatable vehicle-specific product family | Approved sample, fitment record and batch QC plan | Tooling, MOQ, packaging and change control |
Fitment and Installation Checklist
- Confirm model year, generation, trim, bumper version and market.
- Compare mounting holes, sensors, cameras, tow-hook access and cooling openings.
- Measure static ground clearance and clearance at full steering lock.
- Check suspension compression, steep driveway and loading conditions.
- Identify drilling, adhesive, rivnut, bracket and reinforcement requirements.
- Verify jacking points and service access remain usable.
- Use the specified fastener grade, backing hardware and tightening procedure.
- Reinspect fasteners after the initial drive and periodically thereafter.
Professional installation is recommended where drilling, chassis mounting or alignment is required. Do not place yourself beneath a vehicle supported only by a jack. Installation methods and road-use rules differ by product and jurisdiction.
B2B Buyer Checklist for Carbon Fiber Aero Parts
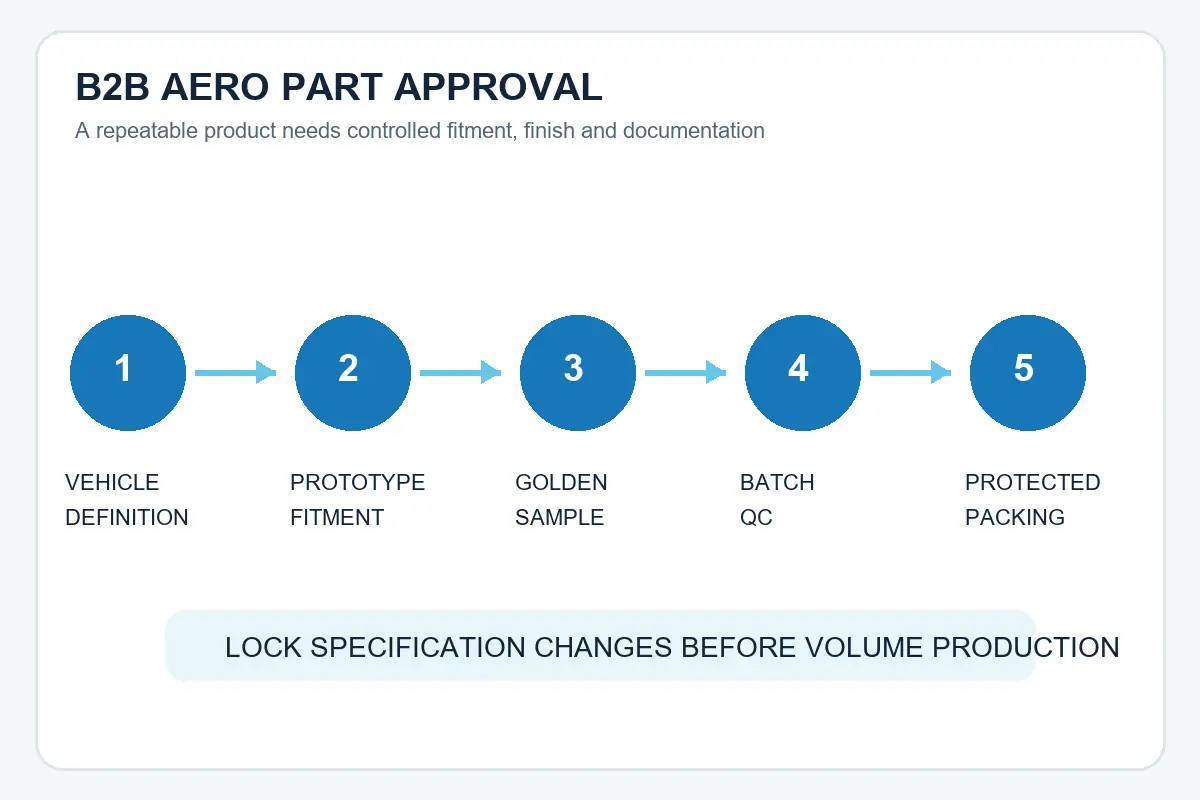
Distributors, tuning brands and private-label buyers need more than a single attractive sample. Before volume production, document the specification that must remain consistent.
- Vehicle definition: generation, model year, trim, bumper and destination market.
- Golden sample: approved shape, gaps, edge profile, weave orientation, gloss level and mounting position.
- Material declaration: laminate type, visible fabric, resin system and any core or bonded insert.
- Dimensional checks: hole position, overall profile, left-right symmetry and mating surfaces.
- Surface standard: limits for pinholes, print-through, weave distortion, dust, scratches and clear-coat defects.
- Hardware: full bill of materials, corrosion resistance, labels and installation instructions.
- Fitment validation: trial installation on the correct vehicle configuration before batch approval.
- Packaging: protection for corners, clear coat and protruding features during export transport.
- Claim control: do not publish downforce or drag figures unless the exact configuration and test basis are documented.
Noah Automotive supports vehicle-specific carbon fiber auto body parts and OEM/ODM programs. Buyers can submit vehicle details, required quantity, finish, branding and packaging requirements through the contact page for a sourcing and fitment review.
Frequently Asked Questions
Is a front lip the same as a splitter?
No. A front lip usually follows and extends the bumper edge, often for styling and limited airflow management. A splitter is a horizontal working surface that projects forward and may carry meaningful aerodynamic load, so its mounting requirements are normally more demanding.
Do side skirts create downforce?
Side skirts do not automatically create downforce. In an integrated package, they can help control crossflow into the underbody and support floor or diffuser performance. Decorative rocker extensions may have little measurable aerodynamic effect.
Does a rear diffuser work without a flat floor?
It can influence flow, but results depend heavily on the air reaching its inlet. A smoother, well-managed underbody generally gives a diffuser better conditions. A short cosmetic insert attached only to the bumper should not be assumed to create significant downforce.
Is a spoiler the same as a wing?
No. A spoiler changes airflow where it meets and separates from the vehicle body. A wing is an airfoil exposed to airflow on both sides and transfers aerodynamic load through its mounts.
Are carbon fiber aero parts always functional?
No. Carbon fiber describes the material, not the aerodynamic result. A carbon part may be cosmetic, structural or both. Geometry, mounting and validated test data determine function.
Can I combine aero parts from different brands?
Physically compatible parts can sometimes be combined, but their aerodynamic interaction may be unknown. Check mounting, clearance and balance, and avoid combining large front or rear devices based only on appearance.
Conclusion
In the front lip vs splitter comparison, the decisive questions are geometry, mounting and evidence. A lip is often the practical choice for a street-focused visual upgrade. A true splitter is a load-bearing aerodynamic device that needs proper support. Side skirts manage the car’s lateral underbody boundary, a diffuser works with expanding underbody flow, and a spoiler changes airflow at the rear body surface.
Choose the component that matches your real objective, verify exact vehicle fitment and treat precise performance claims cautiously unless the supplier discloses how they were obtained. That approach produces a safer, more coherent build—whether you are modifying one car or developing a private-label product range.